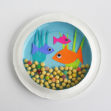
Paper Plate Aquarium

So, in keeping with our Read With Me series, this week we read One Fish, Two Fish, Red Fish, Blue Fish. I’ll share more on the books tomorrow but I wanted to share this cute craft with you today.

Earlier this year, Hosea brought home a paper plate aquarium that he made at his playschool. It was actually one of my favorite crafts he’s brought home. I thought it would be fun to recreate it to go along with our book this week.
You Need:
Two paper plates
Glitter or sand (our glitter was provided free from craftprojectideas.com)
Glue
Paint (we used finger paint provided free from craftprojectideas.com)
Construction paper
Stickers
Hot Glue
Start by painting half of one paper plate blue. I have to admit that my children have never used finger paints before now. Is that strange? I don’t know if all finger paints are like these but I love that this one gave the ocean a really gel-like look.

Then we spread elmer’s glue on the bottom half and he put glitter on it. We didn’t have any sand but the glitter that we used was a dull gold color and it turned out perfect!


I cut out a hole in the middle of the second plate and hot-glued it to the first plate. See how the finger paints make it look realistic? I love that.

Here’s a close up of the sand.

It turned out perfectly! I think it’s just the cutest. Come back tomorrow to read about our review of books 31-40.


